Tab shingles, also known as three-tab shingles, are one of the most popular roofing materials in the United States. They are renowned for their durability, cost-effectiveness, and classic aesthetic appeal. Installing tab shingles can be a DIY project or done by a professional roofing contractor. In this comprehensive guide, we will walk you through the steps and considerations involved in installing tab shingles. Wikipedia.org
Materials and Tools
Before starting your tab shingle installation project, it’s essential to gather all the necessary materials and tools. Here’s a list of what you’ll need:
- Tab shingles: Purchase enough tab shingles to cover your roof’s surface, plus some extra for waste and future repairs.
- Underlayment: Install an appropriate underlayment, such as roofing felt or synthetic underlayment, to provide an extra layer of protection from moisture and enhance the roof’s longevity.
- Roofing nails: Choose galvanized or corrosion-resistant roofing nails to ensure the shingles stay securely in place.
- Roofing adhesive: You may need roofing adhesive to secure the edges and corners of the shingles, especially in high-wind areas.
- Roofing vents and flashing: Install vents for proper ventilation and flashing to protect against water infiltration around roof penetrations like chimneys and vents.
- Roofing safety gear: Ensure you have the necessary safety equipment, including a harness, ladder, and sturdy work boots, to minimize the risk of accidents.
- Measuring and cutting tools: You’ll need a tape measure, chalk line, and a utility knife to measure and cut shingles accurately.
Preparation
- Safety First: Always prioritize safety when working on your roof. Ensure you have the appropriate safety gear and that the weather conditions are favorable for your project.
- Remove the Old Shingles: If you’re replacing an existing roof, remove the old shingles down to the decking. Check for any damaged or rotted sections of the roof, which should be repaired or replaced.
- Inspect the Deck: Examine the roof decking for any defects, such as rot or damage, and repair or replace it as needed.
- Install Underlayment: Roll out and secure the underlayment to the decking using roofing nails. Overlapping the underlayment is crucial to prevent water infiltration.
Installation Steps
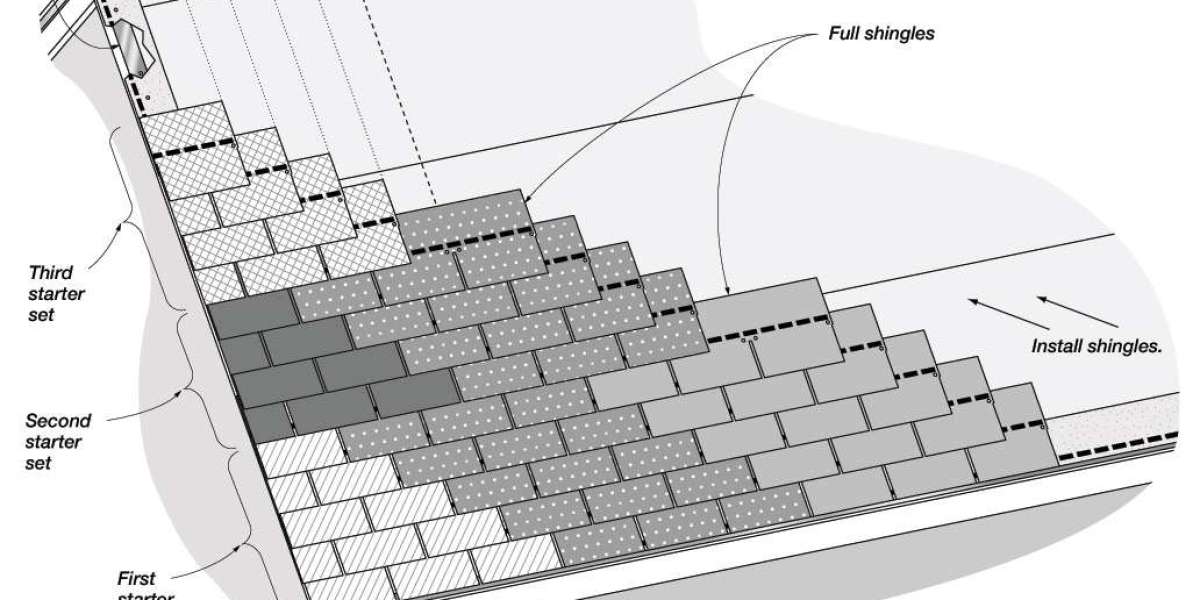
- Starter Row: Start at the bottom edge of the roof, and install a starter row of shingles, ensuring that the tabs face up. This will help prevent water from seeping under the first row.
- First Course: Begin the first course of installing tab shingles over the starter row. Align the first shingle with the roof’s edge, leaving a 5/8-inch overhang. Use roofing nails to secure the shingles, ensuring they are placed in the adhesive strip portion of the tab shingle.
- Overlapping: For the subsequent courses, overlap the shingles to cover the nails on the previous row. Follow the manufacturer’s recommendations for the correct exposure and overlap. Typically, tab shingles have a 5-inch exposure and a 5-inch overlap.
- Stagger Seams: Stagger the seams between the shingles to enhance the roof’s strength and appearance. Avoid aligning the seams vertically.
- Cutting Shingles: Use a utility knife to cut shingles to fit around roof penetrations, such as vents or chimneys. Ensure a snug fit and proper sealing.
- Hip and Ridge Shingles: When you reach the roof’s hip and ridge, install specially designed hip and ridge shingles for added protection and an attractive finish.
- Valleys: If your roof has valleys, take extra care in installing the shingles to ensure they lay flat and create a water-tight seal. Use valley flashing to protect against water infiltration.
- Flashing and Roof Penetrations: Install flashing around roof penetrations and at the eaves to prevent water from getting underneath the shingles. Use roofing cement or adhesive to secure the flashing.
- Ventilation: Install roofing vents to ensure proper attic ventilation. Adequate ventilation helps extend the lifespan of your roof and prevents moisture issues.
- Final Inspection: After completing the installation, perform a thorough inspection to check for any loose or improperly installed shingles. Make any necessary corrections or repairs.
Conclusion
Installing tab shingles can be a challenging but rewarding DIY project or a job for a professional roofing contractor. By following the steps outlined in this guide, you can achieve a durable and visually appealing roofing system that provides long-lasting protection for your home. Remember to prioritize safety, gather the necessary materials, and carefully follow the manufacturer’s instructions and best practices throughout the installation process. With proper installation and maintenance, your tab shingle roof can stand the test of time and weather the elements effectively. Visit official website onlyroofing.com